A broken derailleur shouldn't ruin your ride. Use this 'get you home' fix to create a single gear, so you can limp back and repair it properly later.
A broken rear derailleur my not mean an end to the ride. Removing the derailleur and splitting the chain so you run a single gear at the rear as a great ‘get you home’ trailside repair skill to know.
Tools Required
- Chain link extractor
- 5mm Allen key
- 6mm Allen key
Steps
Step 1
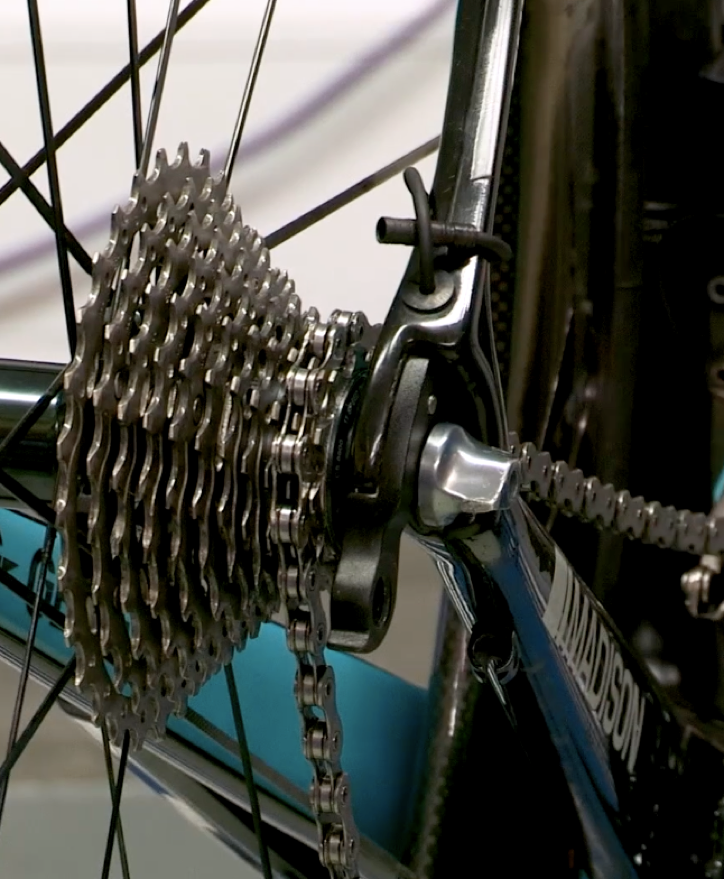
Disconnect the rear derailleur from the bike. If the rear derailleur is a mechanical derailleur, this will involve loosening the cable clamp with a 5mm Allen key so that the cable can be removed from the derailleur. The derailleur can then be removed from the hanger using a 6mm Allen key.
If the derailleur is electronic, it will involve unplugging the cable from the derailleur and removing the derailleur from the hanger by a 6mm Allen key.
Step 2
With the rear derailleur disconnected from the bicycle but hanging down on the chain, wrap the gear cable neatly around the frame. If the gears are electronic, push the electronic cable back into the frame in order to prevent them getting caught.
Step 3
To completely remove the rear derailleur from the bike, the chain must be split to allow the chain to be removed from the derailleur. To do this use a chain link extractor tool to remove a pin and split the chain.

Step 4
If the rear derailleur is okay and it is the rear derailleur hanger that has broken keep the derailleur as it can be used again.
Step 5
With the rear derailleur removed the only option is to now cut the chain to a length where it can only be used in one gear. Cutting the chain to this length will allow you to cycle home, so ensure that the gear picked is suitable for the terrain on your route home.
Step 6
After selecting which gear to use to ride home, make sure that the tension of the chain is okay by pulling the two ends of the chain together and roughly lining up the end links. It is possible that in a certain gear the chain is too slack, in this situation select another gear which will allow for better tension on the chain when it is joined.
Step 7
With the chain pulled together in the chosen gear, mark the link that needs to be split in order for the chain to be the correct length.
Step 8
When splitting the chain, always split the chain to leave an open link with the pin still connected on one end and a closed link on the other end. This is done by using a chain link extractor to push the pin out towards the end of the link, but not all the way out of the link. As the link is being pushed out, the resistance of pushing the pin will increase, at that point stop as this means the link is within the outside plate of the link.

Step 9
With the chain split to the correct length, loop the chain over the chosen gears and push the open and closed ends of the chain together. There should be enough of the pin protruding on the inside of the chain plate on the open link, that the pin should hold the closed end in place.

Step 10
Using the chain link extractor tool again, push the pin through the centre of the closed end link and through into the other side plate of the open end link. This completes the join of the two ends of the chain.
Step 11
The joining link could be very stiff, to loosen the link bend the chain side to side to free it off.
Step 12
The chain is now connected and you would be able to cycle home. However, it has to be remembered that the chain will not be the perfect tension so there is a risk that it may fall out of the selected gear. This could be dangerous so take care and slowly cycle home.
Step 13
Alternatively, there is another way of connecting a chain. Quick links can be bought which will connect two closed ends of a chain together. This method is much quicker and simpler. We would recommend always carrying a quick link in your saddle bag.
Bike Maintenance Series
This guide is part of our bike maintenance series. Explore the other guides:
- Eight Essential Trailside Skills for Bikepacking
- How to Replace an Inner Tube
- How to Deal with a Torn Bike Tyre
- How to Deal with a Snapped Chain
- How to Deal with a Snapped Rear Gear Cable
- How to True a Bike Wheel
- How to Adjust a Front Derailleur
- How to Adjust a Rear Derailleur
Credits
This content is brought to you by Alpkit and our friends at Bicycle Maintenance Guide. They have an app which makes a complete bike maintenance course.
Apple app - https://apple.co/2PFkqMT
Android app - bit.ly/2wOwWCM
This repair has been carried out on a component from a popular brand. If you are using a different component please refer to the manufacturers manual to ensure specific details of the component/task are known. The principles and general skills of the task can be transferred but maybe not the exact details.
Sonder Bikes
-
Sale


Camino Al Apex1 AXS XPLR
- Sram Apex AXS XPLR 12-speed groupset
- Sonder Alpha I25 Gravel UK Made wheelset
€2.299,00
€2.449,00
-
Sale


Camino Al Rival AXS XPLR
- SRAM Rival AXS XPLR 13-speed groupset
- Sonder Alpha I25 Gravel UK Made wheelset
€2.749,00
€2.899,00
-
Sale
Camino TI Force AXS XPLR
- SRAM Force XPLR 13-speed groupset
- Sonder Alpha I25 Gravel UK Made wheelset
€4.749,00
€4.899,00
-
Sale
Camino TI Rival AXS XPLR
- SRAM Rival AXS XPLR 13-speed groupset
- Sonder Alpha I25 Gravel UK Made wheelset
€4.249,00
€4.399,00
-
Flat Bar Best Seller


Camino Al Apex1 Flat Bar
- SRAM Apex 12-speed groupset
- Sonder Alpha I25 Gravel UK Made wheelset
€1.299,00
€1.599,00
-
Sale


Camino Al 105
- Shimano 105 R7120 12-speed groupset
- Sonder Alpha I25 Gravel UK Made wheelset
€1.949,00
€2.099,00
-
Highest customer rating


Camino Al GRX1
- Shimano GRX 610 12-speed groupset
- Sonder Alpha I25 Gravel UK Made wheelset
€1.949,00
€2.099,00
-
Sale


Camino Al GRX2
- Shimano GRX 610 12-speed groupset
- Sonder Alpha I25 Gravel UK Made wheelset
€2.049,00
€2.149,00
-
Sale


Camino Al 105 Di2
- Shimano 105 R7170 Di2 12-speed groupset
- Sonder Alpha I25 Gravel UK Made wheelset
€2.899,00
€2.999,00


Camino Al Frame And Fork
Award-winning gravel bike frame
- 6061 aluminium frame
- Gravel geometry
- Carbon monocoque fork
- Huge tyre clearance
€849,00
-
Sale
Camino TI 105
- Shimano 105 R7120 12-speed groupset
- Sonder Alpha I25 Gravel UK Made wheelset
€3.399,00
€3.549,00
-
Sale
Camino TI GRX2
- Shimano GRX 610 12-speed groupset
- Sonder Alpha I25 Gravel UK Made wheelset
€3.549,00
€3.649,00
Your next reads